In order to get the most audio capability out of Zoom, there are a few things to check:
- Make sure you are running the Zoom desktop client (not the web client). This means that when you start a Zoom meeting, a standalone application should open (not just a browser window). If you don’t have it, the latest download is available here. For more on the differences between the web desktop client, read here. When you sign in on the Zoom desktop client, select “Sign in with SSO” and follow the instructions for signing in with your Cornell account.
- Update your client settings through Cornell’s Zoom portal. Click on ‘login‘, then select ‘settings‘ in the menu bar. Click on ‘In Meeting (Advanced)‘ and scroll down until you see ‘Allow users to select stereo audio in their client settings‘ and ‘Allow users to select original sound in their client settings‘. Make sure both of these are enabled by checking the button on the right and, if not, clicking on it. You will need to restart Zoom for these settings to update.
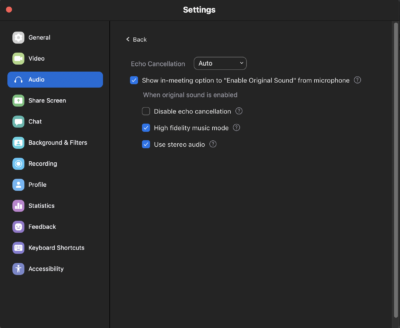
- Inside the Zoom desktop client, open ‘Preferences’ (from the Zoom dropdown menu, or “⌘,” on a Mac) and click on ‘Audio’. There’s a lot you can do here and, depending on which version of Zoom you are on (5.2.3 is the most recent as of this posting), these options will look a little different and may be laid out differently (go to the Zoom dropdown menu and select “check for updates” if you want to make sure you’re running the most recent version). The desired settings might vary based on what you are trying to do, but two settings should be enabled for most applications (these may be under ‘Advanced’, depending on your Zoom version): ‘Show in-meeting option to “Enable Original Sound” from microphone‘ (disabling Zoom’s automatic noise filtering) and ‘Use stereo audio‘ (otherwise any audio you share will automatically be mono, regardless of the source). If you have a higher speed, stable internet connection, enable ‘High fidelity music mode‘ as well. If you get into doing more advanced audio sharing through Zoom, you may end up changing your mic input to a virtual bus (like Blackhole, Soundflower, or Voicemeeter), in which case you’ll probably want to disable ‘Automatically adjust microphone volume‘, and maybe adjust the ‘Suppress background noise‘ setting. In your meeting, if you’re using your mic for music you’ll need to click on ‘Turn on original sound‘ in the upper left corner (which will read the opposite—’Turn off original sound’ when it’s enabled).
- In a meeting, if you want to share your computer sound, click on ‘Share screen‘ and then you can either share a screen (make sure ‘Share computer sound‘ is selected) or click on ‘Advanced’ and select ‘Music or Computer Sound Only‘). If you are sharing sound from Ableton Live or some other program, you need to have the Zoom Audio Device selected as the output (Under ‘Preferences’, ‘Audio’) for this to work.
Zoom 5.2.3 audio settings (click on ‘Advanced’ for second window):


Zoom 5.0.2 audio settings:

