Faq

Zoom audio settings

In order to get the most audio capability out of Zoom, there are a few things to check:

  1. Make sure you are running the Zoom desktop client (not the web client). This means that when you start a Zoom meeting, a standalone application should open (not just a browser window). If you don’t have it, the latest download is available here. For more on the differences between the web desktop client, read here. When you sign in on the Zoom desktop client, select “Sign in with SSO” and follow the instructions for signing in with your Cornell account.
  2. Update your client settings through Cornell’s Zoom portal. Click on ‘login‘, then select ‘settings‘ in the menu bar. Click on ‘In Meeting (Advanced)‘ and scroll down until you see ‘Allow users to select stereo audio in their client settings‘ and ‘Allow users to select original sound in their client settings‘. Make sure both of these are enabled by checking the button on the right and, if not, clicking on it. You will need to restart Zoom for these settings to update.
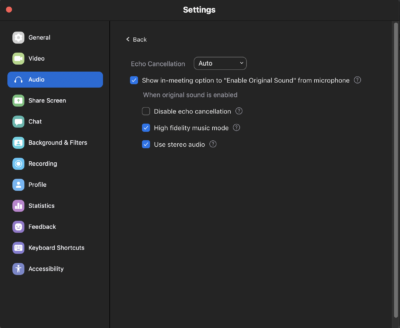
  3. Inside the Zoom desktop client, open ‘Preferences’ (from the Zoom dropdown menu, or “⌘,” on a Mac) and click on ‘Audio’. There’s a lot you can do here and, depending on which version of Zoom you are on (5.2.3 is the most recent as of this posting), these options will look a little different and may be laid out differently (go to the Zoom dropdown menu and select “check for updates” if you want to make sure you’re running the most recent version). The desired settings might vary based on what you are trying to do, but two settings should be enabled for most applications (these may be under ‘Advanced’, depending on your Zoom version): ‘Show in-meeting option to “Enable Original Sound” from microphone‘ (disabling Zoom’s automatic noise filtering) and ‘Use stereo audio‘ (otherwise any audio you share will automatically be mono, regardless of the source). If you have a higher speed, stable internet connection, enable ‘High fidelity music mode‘ as well. If you get into doing more advanced audio sharing through Zoom, you may end up changing your mic input to a virtual bus (like Blackhole, Soundflower, or Voicemeeter), in which case you’ll probably want to disable ‘Automatically adjust microphone volume‘, and maybe adjust the ‘Suppress background noise‘ setting. In your meeting, if you’re using your mic for music you’ll need to click on ‘Turn on original sound‘ in the upper left corner (which will read the opposite—’Turn off original sound’ when it’s enabled).
  4. In a meeting, if you want to share your computer sound, click on ‘Share screen‘ and then you can either share a screen (make sure ‘Share computer sound‘ is selected) or click on ‘Advanced’ and select ‘Music or Computer Sound Only‘). If you are sharing sound from Ableton Live or some other program, you need to have the Zoom Audio Device selected as the output (Under ‘Preferences’, ‘Audio’) for this to work.


Zoom 5.2.3 audio settings (click on ‘Advanced’ for second window):


Zoom 5.0.2 audio settings:


Class performance checklist

In preparation for our final performance, here is a checklist of technical issues to double-check.

1. You are using your Cornell login in Zoom. The easiest way to verify is to visit https://cornell.zoom.com and login, joining the meeting after. You may also need to download the latest Cornell version from the same place.

2. Your Zoom preferences are set to enable stereo audio. See here for details.

3. Your Zoom preferences are set to Show in-meeting option to “Enable Original Sound” from microphone. This will disable Zoom’s noise and echo cancellation. See here for details. Once turned on in preferences, a button will appear in the Zoom window (upper left) to allow you to “Turn on original sound” for your audio device.

4. You are using a hard-wired ethernet connection wherever physically possible! Bandwidth will affect many aspects of your performance and so a hard-wired connection to your home router is ideal.

5. Use good lighting where available! Extra lamps, phone LEDs, and other sources will dramatically improve your camera fidelity.

6. You have reviewed your sound settings for your particular situation by reading this post.

Microphone sanitation

When visiting CEMC studios, as with any lab space on campus utilizing shared equipment (see Cornell guidance), sanitation will be an important part of studio protocols. Keyboards and mice, as well as the desktop itself will are the most obvious, similar to any shared desk or table on campus. But electronic music studios have additional shared items whose design and sensitivity require specific treatment.

Microphones

When using common microphones, the following is recommended.

1. Students must wear an approved mask during any microphone use.

2. Use sanitizing wipes provided, clean the microphone body itself, including the front grill. Then proceed to other surfaces you will come into contact with, such as the microphone clip, the cable, and the adjustment mechanisms of the microphone stand.

2. Use a disposable microphone cover, provided on the desk within each studio. You will want to remove this cover when you exit the studio out of courtesy to the next user. If the microphone is covered when you arrive, replace it with a new one, sanitizing your hands and the mic before putting on a new cover for your own use.

Further advice is provided by the Shure microphone company, makers of the mics we’ll be using this semester.

How should I clean my microphone?

Studio signup reminder

To sign up for a studio time on the course website, log in with the username you created. Then:

1. Go to “Studios” and click on “Sign up for studio times —>”

2. Choose a studio to sign up for from the drop-down menu.

Screen Shot 2014-08-24 at 10.53.57 PM


Note that at the top of this signup page, you will also see a list of your current bookings, if any. Here you can cancel times that you no longer need, important as a courtesy to you colleagues.

3. Click on a desired time slot and confirm it. The schedule defaults to showing the current week and the following week, but you can navigate to future calendars as you like.

Screen Shot 2014-08-24 at 10.56.17 PM

Saving all project materials together in one folder in Ableton Live

Ableton Live projects are stored in folders, containing all pertinent audio files, processed files, MIDI, and other project details. When files are added during mixing (drag-and-drop, etc), their location on the disk is referenced BUT the file itself is not automatically copied into the project folder.

In order to make sure that all files are stored together in the project folder (to bring to another studio, to upload as part of an assignment or finished project, etc), please use “File–Collect All and Save”, which gathers all files into the project folder automatically.

See here for more details: How to ‘Collect All and Save’ a Live Set

If you wish to view a more detailed view of all gathered sounds in any project, this can be done with the “File Manager”, with more information available here.

H4n portable recorders, data transfer to lab systems

There are two methods for transferring audio data from the portable recorders available from the Cox Music Library reservation desk:

  1. Transfer the data using the supplied mini USB cable.
  2. Remove the SDCARD from the recorder and connect it directly to the iMac computers (the port is found, awkwardly) on the back)

Studios accessible to students of Music 1421

A reminder for studio signups:

Studios available to students of Music 1421 include Studio B (B25B), Studio C (B25C), and Studio D (B25D). Please be sure to choose one of these three from the drop-down menu at the top of the page when reserving a time.

If you sign up for time slots in Studio A (B27) you will be unable to access it as it is on a separate key and security.

Studio access with your ID should be available today at the latest.

Prof. Ernste

PD Installation guide

To install PD(-extended) on your Mac, PC, or Linux system please visit:

http://puredata.info/downloads/pd-extended

Download the installer appropriate to your operating system and architecture (I don’t recommend the “Alpha” release for prime-time usage. If you are curious about recent developments in the interface (significant) and function of PD or interested in participating in development, you are welcome to download that also).

For some Mac users, you may need to install “X11”, the venerable Unix graphics system on which some of PD’s functionality rests. You can download that, available now as “XQuartz” from here.

Here, too, is mPD, a mobile version for Android, for those interested:

https://play.google.com/store/apps/details?id=org.mpd

In addition to PD’s built-in Help system, please see the following sites for more help and shared patches.

– PD Forum and Patch Repo – Repository for patches, tutorials, and discussion related to PD.

– PD FLOSS Manuals – including concepts, working patches, and installation/setup help

Programming Electronic Music in PD (“loadbang”) – Johannes Kreidler’s book

Recording audio in Ableton Live

Recording audio directly into Ableton Live’s DAW is simple, requiring only an audio track and the specification of the input channel. This recording method has advantages over an editor, such as Audacity, in that it allows the selection of arbitrary input channels and easily facilitates the layered synchronization of new material onto old.

1) Create an audio track in Live

Screen Shot 2014-10-07 at 4.33.32 PM

2) In the new track’s input/output section, select the audio input channel you wish to record from.

Screen Shot 2014-10-07 at 4.34.24 PM

3) Arm the record for this new track (WARNING: if the input is a microphone, make sure the speakers are turned down, monitoring only through headphones).

Screen Shot 2014-10-07 at 4.34.59 PM

4) Arm the master record (circle, top-level “transport” control) and hit “play” (triangle)

Screen Shot 2014-10-07 at 4.35.58 PM

Connecting your laptop to studio computers and speakers

1) Using the cable supplied in each studio (1/8″ to split 1/4″, red and white), connect your laptop output to the front “Hi-Z 1 and 2” inputs on the Apogee Ensemble (top-most silver device under the computer).

Screen Shot 2014-10-06 at 5.46.56 PM

2) In either Audacity or Live, set monitoring to “On” or arm record for channels 1 & 2 — in Audacity, 1& 2 are the default; in Live you must specify the track input, as shown here:

Tutorial on “Recording Audio” (as needed): https://www.ableton.com/en/articles/recording-audio/

3 (May be needed)) Open the “Apogee Maestro” software (in /Applications if not shown as a purple “A” icon in the Macintosh dock). In the software’s “Input” tab, under channels 1 & 2 (left-most channels), set the input from “Mic” to either “Inst” (instrument) or “+4”, depending on what is listed.

  • If you do this, please do set it back to “Mic” when you are finished as this might confuse others using the studio after you.

maestro-input2-inst

Skip to toolbar